LLM inference from scratch - Part 1
Reading time: ~10 min
AI disclaimer
The source code is completely coded by hand, and the blog is 100% me, not AI. I used AI for generating a Makefile for building and a couple of bash scripts for testing, which I verified manually.
Github repo link
The code is present in this repository with instructions to run the source code and tests.
Table of Contents
A while ago, I did an MLSys course where I learnt the basic structure of LLMs and transformers. I'm interested in optimizing AI workloads in general, and so I took up a project of implementing LLM inference from scratch, to prove to myself, that I was capable of understanding the frontier models as well.
The aim is, to write code such that all I do is download the weights from Hugging Face (the model I picked was Qwen3.5-2B1), and run my code and it will run inference on a prompt. Steadfast in my commitment to maximising my own misery, I added an additional difficulty: I would code from scratch. Which is to say, I restricted myself to using only C++ and only the standard library (STL), and the NVIDIA headers required for writing CUDA code. This meant, for example, that I would have to write the code for reading and parsing the weights myself.
I could've restricted myself even further by not allowing myself to use the STL and having to rely upon custom containers and syscalls for reading files, but I felt like this was enough masochism for one project and I was right, there was plenty of suffering to endure. Because, the way I did it was by reading through Hugging Face's transformers source code2 for how they implemented the inference stack and, well, let's just say it was ... messy.
This blog is part 1 of the process, which I've dedicated to exploring the CPU work that occurs (templating, tokenization etc.) before the GPU is even involved. This part is usually glossed over in courses and articles, with a "somehow the text is converted to tokens and 1 token is approximately 3/4ths of a word". That won't be good enough for us today. We'll go into detail as to what happens in the token construction phase. I want to document this, so that you have an easier time than I did, in case you want to take up a similar project (dont!!).
To start, let's consider a simple python file which runs the model. This will be our reference that we'll replicate.
import torch
from transformers import AutoTokenizer, AutoModelForCausalLM
import argparse

model_name = "Qwen/Qwen3.5-2B"

tokenizer = AutoTokenizer.from_pretrained(model_name)
model = AutoModelForCausalLM.from_pretrained(
    model_name,
    torch_dtype="auto",
    device_map="auto",
)

messages = [ {"role": "user", "content": "who are you?"} ]

text = tokenizer.apply_chat_template(
    messages,
    tokenize=False,
    add_generation_prompt=True,
)

inputs = tokenizer(text, return_tensors="pt").to(model.device)

with torch.no_grad():
    output_ids = model.generate(
        **inputs,
        max_new_tokens=64,
    )

new_tokens = output_ids[0][inputs["input_ids"].shape[1]:]
response = tokenizer.decode(new_tokens, skip_special_tokens=True)

print(response)
Note that the content can vary and be any string (with some restrictions that will be elaborated on later)
In this part, we will be focusing on replicating the CPU work up till (and partially including) the inputs=tokenizer... line.
Applying the chat template
Here's the first interesting code block. Everything above it is just imports and initializations.
text = tokenizer.apply_chat_template(
    messages,
    tokenize=False,
    add_generation_prompt=True,
)
Now, there's several ways we could go about trying to understand and replicate it. The naive way would be to read the codebase and step through it manually, but it's not a good idea because the codebase is extremely convoluted, and it uses a lot of polymorphism which makes static tracing much more difficult. The next idea would be to use a dynamic tracer like viztracer, making use of the fact that the codebase is in Python, thus making it easier to trace. I did this, and it did help, but ultimately, through some skimming of the Jinja template documentation, I realized something about the template. See, all this time I had been assuming that the jinja file gives some parameters and the transformers' internal source code modifies its behaviour according to the parameters, but it's much simpler than that. The Jinja file is the code for producing the template. For example, here's a snippet of the jinja file:
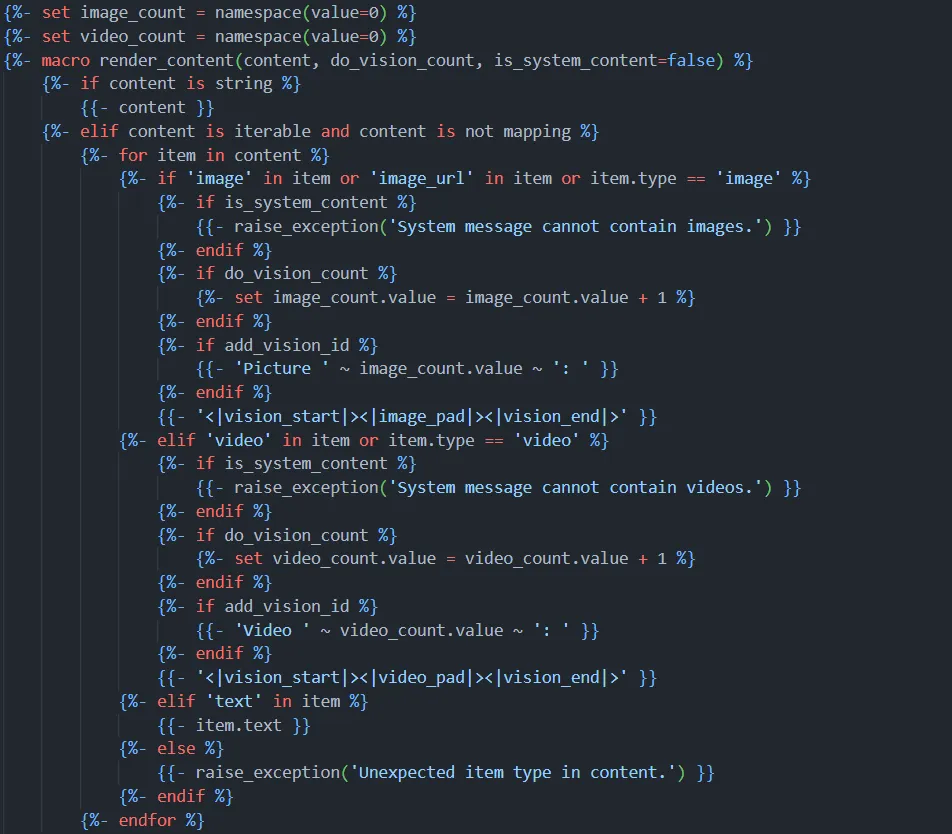
If you squint at this (and ignore the weird characters at the beginning and end of each line) the chat_template.jinja file looks like a weird Python file. Specifically, the parts which deal with our specific prompt are as follows:
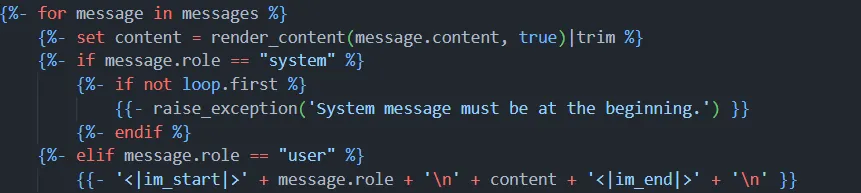
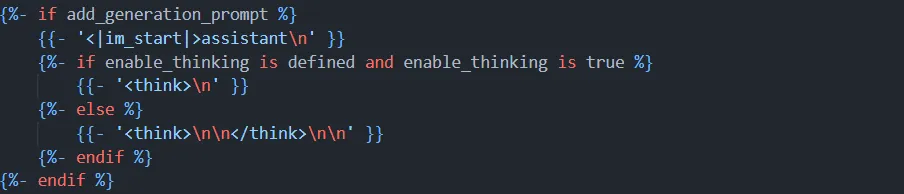
So, the basic algorithm that we get for templating is:
Assume messages = [{"role":"user","content":"(content)"}], where (content) is some string and since add_generation_prompt=True in the function call to apply_chat_template.
Then the templated text becomes <|im_start|>user\n(content)<|im_end|>\n<|im_start|>assistant\n<think>\n\n</think>\n\n.
Let's use an example to help with keeping track of what's happening:
Let's say the prompt was hello, what's up?
Then the templated text is as shown here

The code so far looks like3:
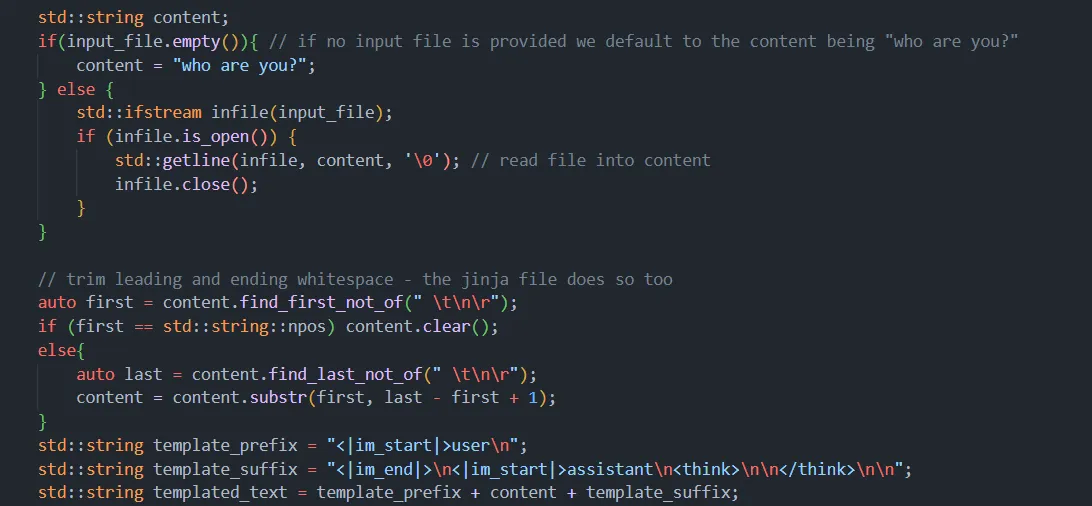
Since I hadn't traced the code completely, and instead gone off of some documentation and "hey this file looks Python-ish", there was a chance that I missed something. Hence, I added some tests for correctness. The tests are text prompts, which are meant to be the values of content in the reference python file.
After running the templated text test (instructions in the README of the repo), you should see the following, and you're good to go.
Templated text test results:
  Passed: 10
  Failed: 0
Tokenization
We shall take a look at what happens when you run the following line.
inputs = tokenizer(text, return_tensors="pt").to(model.device)
The Hugging Face tokenization pipeline describes 4 steps that happen during tokenization:
- Normalization
- Pre-tokenization
- Model
- Post-processing
We'll go through these steps in order. But, before that, there's a step which happens, which extracts special tokens. These special tokens have a meaning to the model, and the model is not meant to take them as literal english words. The tokenizer_config.json lays out these special tokens, the ones relevant to us are:
<|im_start|>: Token no. 248045<|im_end|>: Token no. 248046<think>: Token no. 248068</think>: Token no. 248069 The special tokens are extracted from the templated text, with the text in between staying as is. The code for the above find and replace procedure is as follows:
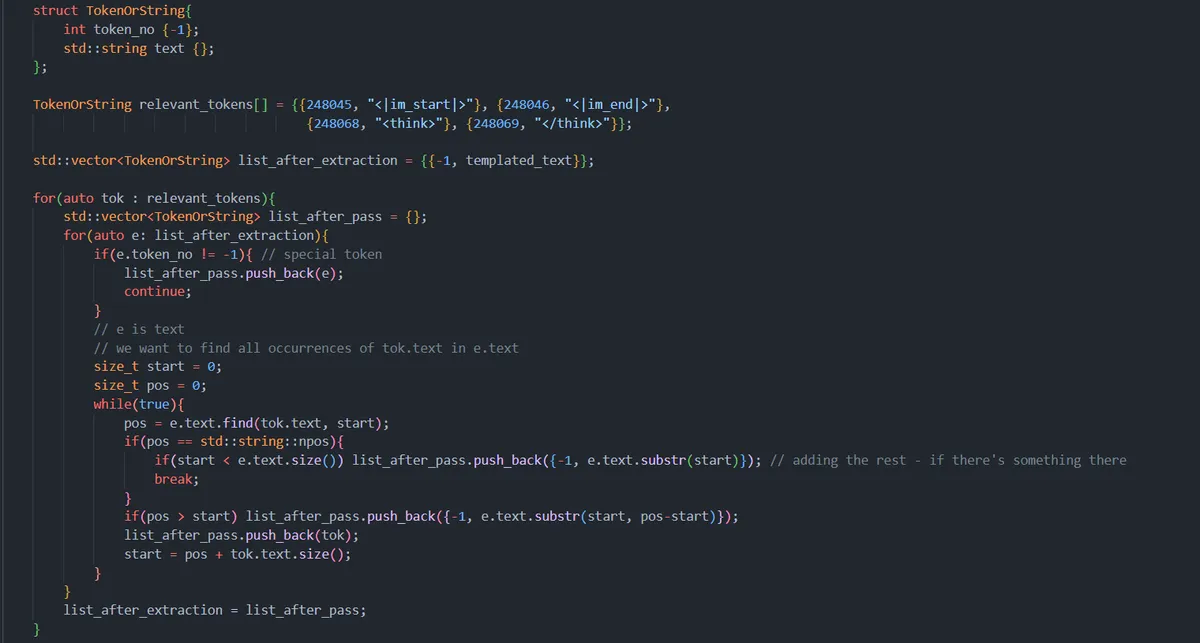
Thus, following our example, the templated text is now converted to a list of strings and tokens like so:

Normalization
Sometimes, a character can be represented in two or more ways in Unicode. For example, the accented e (é) can be represented as U+00E9 or U+0065 U+0301. Now, this results in the same character having multiple representations when interpreted by the machine. The machine would not interpret U+00E9 and U+0065 U+0301 as the same character, even if they look the same to us.
To fix this and make sure that é has only one representation in our prompt (and the training data too), normalization is used. For example, to make sure é has only one representation in the prompt, a normalization algorithm could go through each unicode unit and convert all mentions of U+00E9 to U+0065 U+0301 or vice versa. This fantastic article goes into detail with more examples about where normalization is useful.
The tokenizer.json file defines the normalizer as NFC, which is a fairly standard normalizer. I decided to not implement this in my own code for two reasons:
- Hugging Face doesn't actually implement the normalizer, it has a wrapper over the Rust crate
unicode-normalization-alignmentswhich it calls, and the crate actually implements the normalization algorithm. - It seems like a fairly straightforward and boring algorithm, where all you're doing is looking up into a table which tells you how to split/combine the Unicode values.
The main takeaway is that the normalizer mostly comes into play when you're using accented characters, emojis and other scripts (eg: Hindi, Korean etc.) in Unicode. So, instead of handling all text that could be put in content, I decided to only handle text that doesn't contain any emojis, accented characters and characters from other scripts. This is what I was referring to when I said the content can be any string with some restrictions (basically only ASCII text).
I put "mostly" in the above paragraph because I was recently informed 4 that the normalizer can be really important even for innocuous looking characters. In particular, I learnt that U+0062 and U+1D5BB both are indistinguishable and render as b in most fonts (at least the ones that I'm using), while only the former is the actual ASCII character b. There are some very weird edgecases which can mess you up. PSA: Use a normalizer for all serious work.
Anyways, with the restriction of ASCII only text, our normalizer becomes very simple, we do nothing.
Pre-tokenization
The Hugging Face tokenization pipeline describes Pre-tokenization as follows:
Pre-tokenization is the act of splitting a text into smaller objects that give an upper bound to what your tokens will be at the end of training
The Qwen model uses two pre-tokenizers as described in tokenizer.json, the first of which is a Split tokenizer with the regex being (?i:'s|'t|'re|'ve|'m|'ll|'d)|[^\r\n\p{L}\p{N}]?[\p{L}\p{M}]+|\p{N}| ?[^\s\p{L}\p{M}\p{N}]+[\r\n]*|\s*[\r\n]+|\s+(?!\S)|\s+
Note that \p{L} matches any Unicode letter, \p{N} matches any Unicode number and \p{M} matches any Unicode mark, which are mainly combining accents. Due to the restrictions placed on the content during normalization, our text won't have any characters from \p{M}. Also \s matches any whitespace character (\r, \n, \t, ' ' 5) and \S any non whitespace character.
This regex has 7 rules, and tries to match rules in order. Going through these one by one:
(?i:'s|'t|'re|'ve|'m|'ll|'d): It's a case insensitive match for common contractions in text. Text like'Sor'rEwill be matched by this.[^\r\n\p{L}\p{N}]?[\p{L}\p{M}]+: First it optionally matches one character that isn't a letter, number or newline. Then it matches as many letters or marks (it has to match at least one). Text likewayor*lewill be matched by this.\p{N}: This matches exactly one number.?[^\s\p{L}\p{M}\p{N}]+[\r\n]*: This looks for 0 or 1 space character (' '), then matches as many characters as possible (at least one) that aren't whitespace, letters or numbers. Then it matches as many new lines as possible (0 or more). This matches text like<space>,\n\nor.\r\n. (Assume<space>denotes actual space (the' 'character))\s*[\r\n]+: This looks for as many whitespace as possible (0 or more), while ensuring that at least one newline char is in there. If there are multiple newline chars, it extends to the last newline char (it matches as much as possible). So stuff like<space>\n\n\nis matched with this.\s+(?!\S): This rule is a bit of a weird one. It matches as many whitespace as possible (1 or more), while ensuring that the next character is not a non-whitespace character, i.e. the next character doesn't exist (it's the end of the string) or the next character is a whitespace character. For example, if a text is<space><space>helloit will not match<space><space>, as the next character isnt whitespace, it'll only match<space>.\s+: This matches at least one whitespace character and matches as many as possible.
I won't put the code here, since it's a bit long and it's basically doing what I've spelled out here in pseudocode, but if you're interested, the code is there in the repository. Also, I added a test for checking the regex parsing and splitting. After running it, you should see this output:
Split pretokenization test results:
  Passed: 10
  Failed: 0
and then you're good to go.
Following with our example, the text after split pre-tokenization looks like:

I'll stop here for today. Stay tuned for part 2, where we explore the ByteLevel pre-tokenizer, the Byte Pair encoding algorithm, how to read safetensor files and more! If you decide to attempt a similar project with another model (or maybe extend this model but with multimodal input etc.), I hope this blog helps you have an easier time and hopefully you won't have to flounder around as much as I did.
If you find any mistakes, please let me know at singhigeet1729 [AT] Google mail. I'd love to hear your feedback and thoughts in general. My inbox is full of stuff I don't want and scarce in stuff I do want, so I'd immensely appreciate you tipping the scales a little :)
I didn't put a whole lot of thought into picking the model other than making sure it was small so that I could run it on my laptop and that it was (relatively) modern.↩
I know there's projects like
llama.cppwhich aim to do what I'm doing but for all the LLM models, and they probably have some good abstractions that make writing code easier. For this project I could've looked at that and, at best, written it in my own way, or at worst copied their code. Neither seemed right to me. So, I decided not to look atllama.cppat all. Similarly, I felt that if I used AI for generating the code, it would use their code directly or indirectly, so I didn't use AI either.↩This code would not generalise to all forms of templating, say, if we had
enable_thinking=Truein the function call toapply_chat_template. The aim of the project isn't to have all sorts of templating. It's just to replicate the python starter code, where the content can be any string (with some restrictions that I'll explain later)↩There are more forms of whitespace that
\smatches to, such as\vand\fbut those are pretty rare and arcane, and thus not really all that important to consider.↩